Create a graphical user interface (GUI)
The graphical user interface (GUI) consists of all the elements the user can interact with (read, click, drag, resize, select, input):
- text
- button
- checkbutton
- radiobutton
- menu (pop-up, pull-down)
- listboxe
- slider
Text attributes
We store all pygame text attributes as class variables:
class Text(Node):
    """Create a text object which knows how to draw itself."""

    fontname = None
    fontsize = 36
    fontcolor = Color('black')
    background = None
    italic = False
    bold = False
    underline = False
After initializing the Node, we update the instance variables from the Text class variables:
super().__init__(**options)
self.__dict__.update(Text.options)
The font size and the three styles (bold, italic, underline) are set at font creation:
def set_font(self):
     """Set the font and its properties."""
     self.font = pygame.font.Font(self.fontname, self.fontsize)
     self.font.set_bold(self.bold)
     self.font.set_italic(self.italic)
     self.font.set_underline(self.underline)
The font color and the background color are set when rendering the text:
def render(self):
    """Render the text into an image."""
    self.img = self.font.render(self.text, True, self.fontcolor, self.background)
    self.rect.size = self.img.get_size()
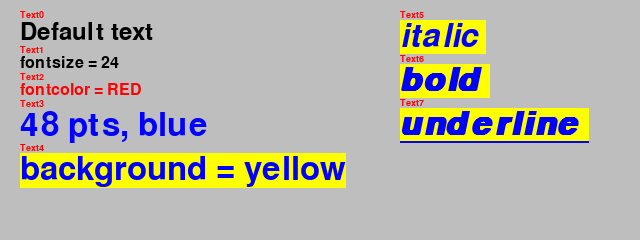
Here is a code example:
"""Display text with different size, color and font."""
from app import *

class Demo(App):
    def __init__(self):
        super().__init__()
        Scene(caption='Text')
        Text('Default text')
        Text('fontsize = 24', fontsize=24)
        Text('fontcolor = RED', fontcolor=Color('red'))
        Text('48 pts, blue', fontsize=48, fontcolor=Color('blue'))
        Text('fontbg = yellow', fontbg=Color('yellow'))

        Text('italic', pos=(400, 20), italic=True)
        Text('bold', bold=True)
        Text('underline', underline=True, font_bg=None)

if __name__ == '__main__':
    Demo().run()
Which produces this result:
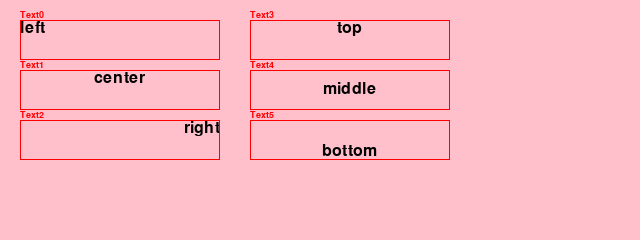
Horizontal and vertical alignment
For a given box size, text can be aligned horizontally to the left, center, or right. The following code aligns the text image with these three positions:
w, h = self.rect.size
w0, h0 = self.text_img.get_size()

if self.h_align == 0:
    x = 0
elif self.h_align == 1:
    x = (w-w0)//2
else:
    x = w-w0
In the vertical direction the text image can be aligned at the top, middle or bottom:
if self.v_align == 0:
    y = 0
elif self.v_align == 1:
    y = (h-h0)//2
else:
    y = h-h0

self.img0.blit(self.text_img, (x, y))
self.img = self.img0.copy()
The image img0 is the orignal, used for scaling. The img is the one used for drawing.
Here is a code example:
"""Horizontal and vertical text alignement."""
from app import *

class Demo(App):
    def __init__(self):
        super().__init__()

        Scene(caption='Text Alignment', bg=Color('pink'))
        Text('left', size=(200, 40), fontsize=24)
        Text('center', h_align=1)
        Text('right', h_align=2)
        Text(bg=Color('blue'), fontcolor=Color('white'))

        Text('top', pos=(250, 20), h_align=1)
        Text('middle', v_align=1)
        Text('bottom', v_align=2)

if __name__ == '__main__':
    Demo().run()
Which produces the following result:
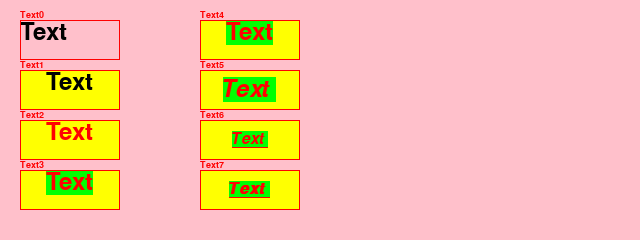
Text attributes
A Text object has various attributes which are remembered.
Here is a code example:
"""Text with size, alignment, fontcolor, font background..."""
from app import *

class Demo(App):
    def __init__(self):
        super().__init__()

        Scene(caption='Text', bg=Color('pink'))
        Text(size=(100, 40))
        Text(bg=Color('yellow'), h_align=1)
        Text(fontcolor=Color('red'))
        Text(fontbg=Color('green'), cmd='print(self.text)')

        Text(pos=(200, 20))
        Text(italic=True, v_align=1)
        Text(underline=True, fontsize=24)
        Text(bold=True)

if __name__ == '__main__':
    Demo().run()
It produces the following result:
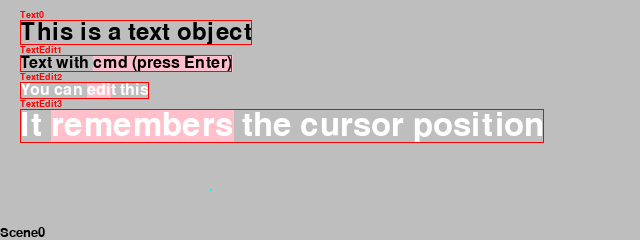
Editable text
The class TextEdit provides editable text with a movable cursor.
The cursor is represented as a small rectangle which is rendered under the text.
A selection is represented as a large rectangle under the selected letters.
Create the cursor
The class attribute TextEdit.cursor defines the cursor color and width:
cursor = Color('red'), 2 # cursor color and width
Inside the conxtructor, the cursor is placed at the end of the text. A cursor image is created and filled with the cursor color. The cursor rectangle is initally placed at the end of the text:
col, d = TextEdit.cursor
self.cursor = len(self.text)
self.cursor_img = pygame.Surface((d, self.rect.height))
self.cursor_img.fill(col)
self.cursor_rect = self.cursor_img.get_rect()
self.cursor_rect.topleft = self.rect.topright
Get the character index
The cursor is represented as an integer index in the range [0 .. n] where n is the
lenght of the text. Each letter has a different width. The list
self.char_positions remembers the x position of each letter:
def set_char_positions(self):
    """Get a list of all character positions."""
    self.char_positions = [0]
    for i in range(len(self.text)):
        w, h = self.font.size(self.text[:i+1])
        self.char_positions.append(w)
When we click with the mouse anywhere in the text, we need to know the character index:
def get_char_index(self, position):
    """Return the character index for a given position."""
    for i, pos in enumerate(self.char_positions):
        if position <= pos:
            return i
    # if not found return the highest index
    return i
Move the cursor
The arrow keys allow to move the cursor to the left or to the right.
The argument d is 1 or -1 and indicates the direction of movement.
The cursor movement is limit to the interval [0 .. n]:
def move_cursor(self, d):
    """Move the cursor by d charactors, and limit to text length."""
    mod = pygame.key.get_mods()
    n = len(self.text)
    i = min(max(0, self.cursor+d), n)
Pressing the CMD key, the cursor goes all the way to the beginning or the end of the line:
if mod & KMOD_META:
    if d == 1:
        i = n
    else:
        i = 0
Pressing the ALT key, the cursor goes to the end of the word:
if mod & KMOD_ALT:
    while (0 < i < n) and self.text[i] != ' ':
        i += d
Pressing the SHIFT key prevents cursor2 from moving, thus setting a selection:
if not mod & KMOD_SHIFT:
    self.cursor2 = i

self.cursor = i
Copy, cut and insert text
The two cursors can be inverted. The following method returns the two cursors (selection indices) in the right order:
def get_selection_indices(self):
    """Get ordered tuple of selection indicies."""
    i = self.cursor
    i2 = self.cursor2

    if i < i2:
        return i, i2
    else:
        return i2, i
To copy text we save the selection in a Scene variable text:
def copy_text(self):
    """Copy text to Scene.text buffer."""
    i, i2 = self.get_selection_indices()
    text = self.text[i:i2]
    App.scene.text = text
To cut text we copy the text and replace the selection with an empty string:
def cut_text(self):
    """Cut text and place copy in Scene.text buffer."""
    self.copy_text()
    self.insert_text('')
To insert text we replace the current selection with the new text:
def insert_text(self, text):
    """Insert text at the cursor position or replace selection."""
    i, i2 = self.get_selection_indices()
    text1 = self.text[:i]
    text2 = self.text[i2:]
    self.text = text1 + text + text2
    self.cursor = i + len(text)
    self.cursor2 = self.cursor
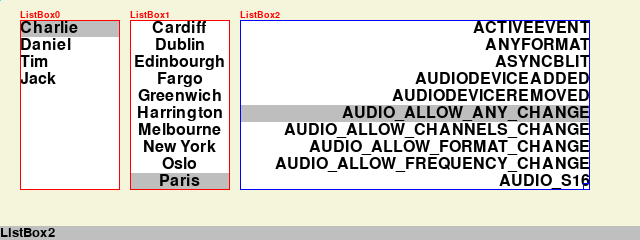
ListBox
The ListBox class displays a list of items. One item can be selected with a mouse-click or with the UP/DOWN arrow keys. Pressing the RETURN key executes the command.
Detecting double-clicks
In order to detect double-clicks or multiple clicks we need to use a timer event. The reason for using a timer is that we cannot know at the time of a mouse click if there are more clicks to follow. We only know for sure after a short timeout period. So we define a new event as the first USEREVENT:
DBL_CLICK_TIMER = pygame.USEREVENT
DBL_CLICK_TIMEOUT = 250
Inside the Scene.do_event() we look for a MOUSEBUTTONDOWN event
and we set a timer and increment the clicks:
if event.type == MOUSEBUTTONDOWN:
    pygame.time.set_timer(DBL_CLICK_TIMER, DBL_CLICK_TIMEOUT)
    self.clicks += 1
Once the timeout occurs, we
reset (disable) the timer
print the number of clicks and
reset the click count to zero:
elif event.type == DBL_CLICK_TIMER:
    pygame.time.set_time(DBL_CLICK_TIMER, 0)
    print(self.clicks, 'clicks in', self.focus)
    self.clicks = 0
The text printed to the console looks like this:
2 clicks in Text0
4 clicks in Text0
3 clicks in Ellipse1
1 clicks in Rectangle2
2 clicks in None